A plain pair of jeans can feel completely different after adding one small patch. You might want to personalize a simple pair, cover a distressed area you no longer like, or keep a favorite ripped design from becoming too large.
Before you start sewing, pay attention to the condition of the denim underneath. If the fabric is still strong, you can usually sew the patch directly onto it. If the area is thin, heavily frayed, or torn, it may need extra support first. The steps below will show you how to position and hand-sew your patch neatly and securely.
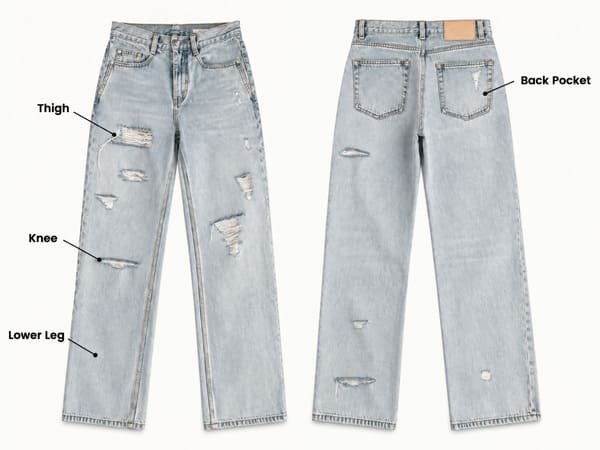
Where Should You Put a Patch on Jeans?
There is no single “correct” place for a decorative patch, but some areas are easier to work with than others.
Thigh
It usually gives you a relatively flat area with enough room to position and sew around the patch comfortably.
It also works well for medium or larger decorative patches that you want to make part of the overall design.
Knee
A knee patch is much more noticeable, but this part of your jeans bends constantly when you walk, sit, or squat.
Avoid choosing a patch that feels excessively stiff for the size of the area. Before sewing, temporarily position it and bend your knee a few times to make sure it still feels comfortable.
Back Pocket
A patch on a back pocket can look clean and intentional, especially with smaller embroidered or woven designs.
The main thing to watch is the pocket opening. Before every few stitches, check the inside so you do not accidentally sew the pocket closed.
Hip, Side, or Lower Leg
These areas can work very well for decorative placement, although sewing may take a little more patience because seams and narrow pant legs can restrict access.
SML Experience Tip: Use a little low-tack removable tape to hold the patch in place first, then try the jeans on. Walk, sit, and bend your legs to see whether the placement still feels right when worn.
What You’ll Need
You do not need many specialist tools for hand sewing a patch onto jeans.
Prepare:
- a sturdy hand-sewing needle
- strong sewing thread
- fabric chalk
- scissors
- low-tack removable tape
If you do not have fabric chalk, a washable fabric marker can work.
Try to choose thread close to the color of the patch border when you want the stitching to blend in. A contrasting thread can also work, it will make the stitching part of the visible design.
How to Sew a Patch on Jeans by Hand
The following method is best when you are sewing onto denim that is not badly torn. If you are covering an actual hole or a weakened area, read the section on damaged denim below before you start.
Step 1: Prepare the Jeans and Position the Patch
Start with clean, dry jeans and flatten the area where you want to place the patch. Move the patch around until it sits in a spot that looks natural, keeping nearby seams, pockets, and other details in mind.
Once you are happy with the placement, mark a few reference points with fabric chalk and secure the patch so it cannot shift while you sew.
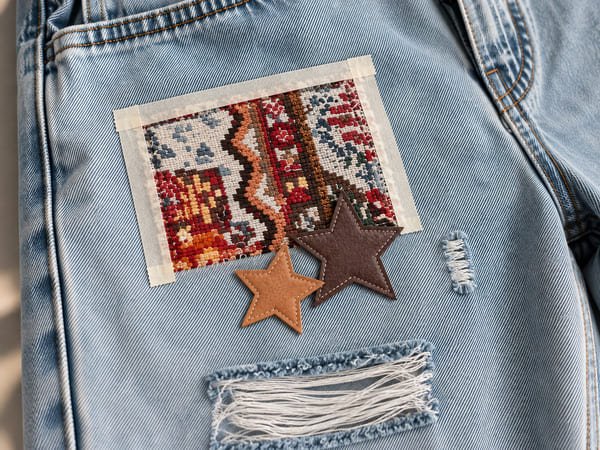
SML Experience Tip: Before sewing, use a few small pieces of low-tack removable tape to hold the patch in place. This helps keep the patch aligned and prevents it from shifting while you sew. Remove each piece of tape as your stitching reaches it.
Before sewing, check the inside of the jeans to make sure there is no pocket, lining, or second layer directly behind the area you are working on.
Step 2: Start Sewing From the Inside
Cut a manageable length of strong thread, thread the needle, and tie a secure knot at the end. Starting from inside the jeans, bring the needle through the denim close to the patch border so the knot remains hidden.
Sew around the edge using small, evenly spaced stitches. Keep each stitch close enough to the border to hold the patch flat, and use thread close to the border color if you want the stitching to be less noticeable.
Keep the thread firm, but do not pull it too tight. The patch should sit flat against the denim without causing the surrounding fabric to gather or wrinkle.
Step 3: Work Around the Entire Edge
Continue working slowly around the patch, taking a little more care around curves, corners, and irregular edges.
From our experience, one of the easiest mistakes is catching the wrong layer of fabric. When sewing on a pant leg, use your free hand to separate the front and back layers, but keep your fingers away from the path of the needle. After the needle passes through the fabric, quickly check the inside before pulling the stitch tight.
If you are sewing near a pocket, keep the pocket fabric separate from the outer denim and check it from time to time so you do not accidentally stitch the pocket closed.
Step 4: Finish the Thread and Check the Patch
Once you have completed the full edge, bring the needle to the inside of the jeans.
Secure the thread with a firm knot and trim away the excess.
Then inspect the entire patch.
Run a finger around the border and gently lift different sections. If one corner or curve feels loose, add a few additional stitches before considering the job finished.
Also check the inside of the jeans for long loose threads or accidental stitches through another layer.
Your finished patch should sit flat against the denim without puckering around the outside.
How to Sew a Patch Over a Hole in Jeans
When sewing a patch over a hole, first check the denim around the damaged area. Your stitches need to anchor into strong fabric rather than loose, heavily frayed fibers.
For a Small Hole or Distressed Area
If the denim around the hole still feels firm, choose a patch that covers the damaged area and extends onto strong fabric around it.
Keep your stitches out of loose or heavily frayed fibers. The thread needs to pass through stable denim so the patch has something strong to hold onto. You can trim a few loose threads if they interfere with placement, but there is usually no need to cut away healthy fabric.
For a Larger or Weakened Area
If the denim around the hole has become thin, stretched, or weak, sewing a decorative patch directly over it may not be enough.
Reinforce the damaged area first, then sew the decorative patch on top. The reinforcement gives the weakened denim support, while the visible patch becomes part of the final design.
A Real Example: Reshaping an Oversized Knee Rip With a Small Patch
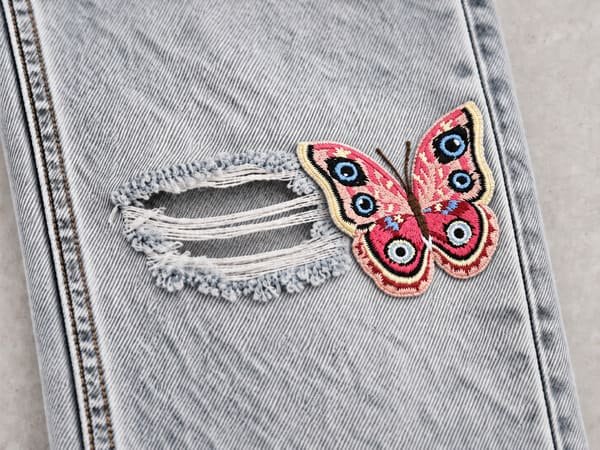
I had a pair of jeans that originally came with a ripped knee design. After wearing them for a long time, the opening gradually stretched much larger than I wanted.
I still liked the distressed look, so I did not want to cover the hole completely. Instead, I chose a small decorative patch—about one quarter of the size of the opening—and hand-sewed it along one side of the rip.
The patch partially covered the oversized opening while leaving enough of the original distressed denim visible. In the end, I kept the style I liked but turned the stretched rip into a detail that felt much more intentional and personal.
This is also a good reminder that a patch does not always need to cover an entire hole. Sometimes it can simply help reshape or customize an existing design.
Common Mistakes When Sewing a Patch on Jeans
Hand-sewing a patch is fairly simple, but a few small mistakes can affect both how the patch looks and how securely it stays in place.
Catching the Wrong Layer of Denim
Before each section of stitching, check what is behind the fabric. On a pant leg, accidentally catching the opposite side can sew the leg partly closed. Around a pocket, the same mistake can close the pocket opening.
Keep the fabric layers separated as you work and check the inside regularly, especially before pulling each stitch tight.
Pulling the Thread Too Tight
More tension does not make the patch more secure. Pull each stitch only until the patch sits flat against the denim.
If the fabric starts to wrinkle or gather around the edge, the thread is too tight. Loosen the tension and smooth the denim before continuing.
Forcing a Needle That Is Too Fine
Denim and a patch can create several dense layers. If your needle bends noticeably, feels difficult to control, or requires excessive force to push through the fabric, switch to a stronger hand-sewing needle.
A thimble can also help with thicker sections, but avoid forcing the needle through with your bare fingers.
How to Make a Hand-Sewn Patch Last Longer on Jeans
A secure patch should not require much maintenance, but a little care helps reduce unnecessary wear.
Check the Edges
The edge is normally the first place where a sewn patch begins to loosen.
If you notice one or two stitches coming undone, repair them early instead of waiting for a larger section to lift.
Wash the Jeans Inside Out
Turning jeans inside out can reduce direct rubbing between the patch surface and other clothes during washing.
This is particularly useful for textured decorative patches.
Avoid Pulling at Raised Edges
If part of the border catches on something, do not keep pulling it.
Frequently Asked Questions
Absolutely, a patch can be purely decorative. You can add one to plain jeans to change the style, add a personal design, or create a more customized look.
You need a needle strong enough to pass comfortably through the denim and patch edge.
Very fine household needles may bend when working through thick layers. A sturdy hand-sewing needle and a thimble are usually more practical.
If you want the stitching to disappear visually, choose thread close to the patch border color.
If you want the stitching to become part of the design, a contrasting color can create a more handmade appearance.
Tight enough to keep the patch flat, but not so tight that the denim puckers. If wrinkles begin forming around the edge while you sew, reduce the thread tension.
Customize Your Jeans With a Patch That Fits Your Style
A patch can cover a worn area, but it can just as easily become part of the design of perfectly good jeans.
The shape, size, color, texture, and position all affect the final look. A small detailed patch near a pocket can feel subtle, while a larger embroidered design on the thigh or knee becomes a stronger visual feature.
If you are not sure which patch construction best suits your design, you can also read our guide to Types of Custom Patches: How to Choose the Right Style for Your Design before deciding.
For a custom project, you can adjust the shape, size, colors, artwork, and overall finish to suit the garment instead of trying to make a generic patch fit the design.
Ready to create your own patch? Get a free quote and tell us where you plan to use it.