
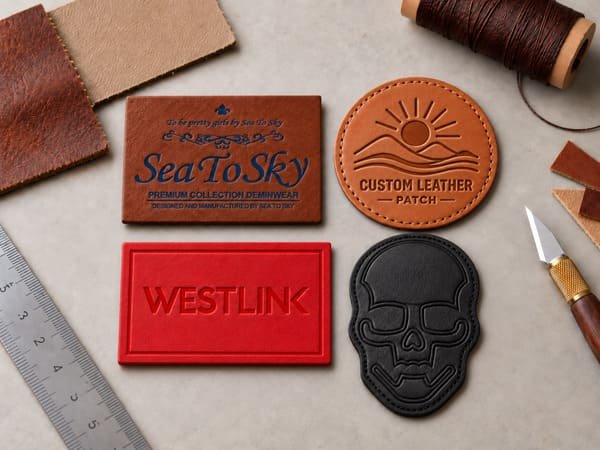
If you are ordering custom leather patches for the first time, choices such as material, decoration method, and backing can quickly become confusing.
The good news is that you do not need to understand every technical term before getting started. This guide walks you through the key choices that affect how a leather patch looks, feels, and performs—so you can approach your first project with a much clearer idea of what you need.
What Is a Leather Patch?
A leather patch is a decorative or branded patch made from genuine or faux leather. Logos, lettering, and graphics can be pressed, engraved, printed, or color-filled directly onto the leather surface.
If you want a patch with a clean, structured look where the material itself becomes part of the design, leather is a strong option. Its surface texture and finish give the patch a different character from thread-based patches, making it especially suitable for simple branding, lettering, and bold graphic elements.
How Leather Patches Differ From Embroidered Patches
Embroidered patches create the design mainly with thread, using stitch direction, density, and thread color to build the artwork.
Leather patches work differently—the leather surface remains visible, while the logo is pressed, engraved, printed, or otherwise added directly to it. This makes the material itself an important part of the finished look.
If you want visible thread texture or a highly stitched appearance, embroidery may be more suitable.
If you prefer a cleaner, more material-focused look with a tactile leather surface, a leather patch may be the better fit.
Choosing the Right Leather for Your Patch
For many first-time buyers, one of the first important decisions is choosing the patch material. The two main starting options are genuine leather and faux leather.
Both can produce attractive custom patches, but they differ in appearance, consistency, aging, color choice, and cost.
Genuine Leather Patches
Genuine leather comes from natural animal hide, which means its surface is not perfectly uniform.
You may see slight variations in grain, texture, tone, or markings from one piece to another. This is normal with genuine leather and should be understood as part of the material’s natural character rather than automatically treated as a defect.
Natural leather is not expected to look perfectly identical from piece to piece.
If your brand or product benefits from a natural, tactile, and slightly individual appearance, this variation can be an advantage rather than a problem.
Genuine leather can also develop more character with use, with its tone and surface appearance changing gradually over time depending on the leather and finish.
It is often a good starting option for products where a natural material feel is important, such as premium caps, denim, jackets, workwear, bags, and accessories.
From our production experience, it is helpful to confirm your tolerance for natural variation before sampling or bulk production. If a project requires very tight consistency in color and surface appearance, faux leather may be easier to control than genuine leather.
Faux Leather Patches
Faux leather is a synthetic material designed to provide a leather-like appearance and surface.
One of its biggest advantages for custom patches is consistency.
Because the material is manufactured rather than naturally grown, its grain, surface appearance, and color can usually be controlled more consistently across a production run.
Faux leather also typically gives you access to a wider and more predictable color range. This can be useful when you are trying to coordinate a patch with a specific garment, cap, bag, or brand palette.
Faux leather also comes in different thicknesses, textures, and finishes, so the specific material should still be selected according to the final product and design.
Genuine or Faux Leather? A Quick Comparison
| Factor | Genuine Leather | Faux Leather |
|---|---|---|
| Surface | Natural grain and variation | More controlled and consistent |
| Color consistency | May vary slightly | Usually more consistent |
| Aging | Can develop natural character | Appearance is generally more stable |
| Color choices | Often more limited | Usually wider |
| Cost | Usually higher | Usually more budget-friendly |
| Best starting point | Natural, premium material feel | Consistent bulk production and wider color choice |
Rather than asking which material is “better,” decide what matters most for your project. Choose genuine leather when natural character is the priority, or faux leather when consistency, color choice, and production control matter more.
How Are Logos and Designs Added to Leather Patches?
Once the leather is chosen, the next step is deciding how your logo or artwork should appear on the surface. Different methods create different levels of depth, detail, texture, and color.
In our production, the most common options include debossing, embossing, laser engraving, and printed or color-filled details. Here is what each method looks like and when it is usually a good choice.
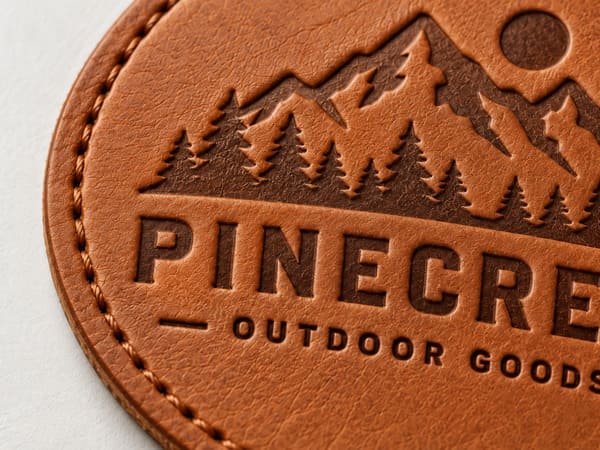
Debossed Leather Patches
Instead of sitting above the material, the logo or lettering forms a recessed impression.
The result is usually clean and relatively understated. The leather remains the visual focus, while the logo is defined through depth, shadow, and surface contrast.
Debossing often works well for:
- simple brand marks
- bold lettering
- clear geometric graphics
Debossing works especially well for simple logos, bold lettering, and clear graphic shapes. The result is usually subtle and understated, with the design defined mainly by depth and shadow.
Embossed Leather Patches
Embossing raises the design above the leather surface, creating a more dimensional and tactile effect.
It is a good choice when you want the logo or lettering to stand out more visibly from the background while still keeping the leather surface as part of the design.

Laser-Engraved Leather Patches
Laser engraving uses a laser to create the logo or artwork directly on the leather surface. It produces a flat, engraved appearance rather than the raised or recessed effect of embossing and debossing.
It is a practical choice for designs with fine lines, smaller lettering, or more detailed graphics, because the laser can reproduce details that may be difficult to achieve with a pressed design.
The final engraved color and contrast can vary depending on the leather color and surface finish, so sampling is useful when the exact appearance is important.
Printed or Color-Filled Leather Patches
If color is an important part of your logo, printed or color-filled details can be used to create stronger contrast or add multiple colors to the patch.
This option is useful when the design cannot be communicated clearly through embossing, debossing, or engraving alone—for example, when specific brand colors or colored graphic elements need to remain visible.
Which Decoration Method Is Best for Your Design?
Once you understand the main decoration methods, the next step is deciding which one suits your artwork best. The right choice depends mainly on the level of detail, line thickness, text size, and the final patch size.
Simple Logos and Bold Text
If your design uses bold lettering, thick lines, simple icons, or clear geometric shapes, embossing and debossing are often good options. These designs usually leave enough space for the raised or recessed details to remain clear and recognizable.
They also tend to work better at smaller patch sizes because the important visual elements are easier to preserve.
Fine Lines, Small Text, and Detailed Artwork
If your logo contains thin lines, small lettering, narrow gaps, or more detailed graphics, laser engraving may be a better choice. It can reproduce finer details without relying on the same raised or recessed structure used in embossing and debossing.
However, very small details still have practical limits. A design may look perfectly clear on a screen but become difficult to read once it is reduced to the actual patch size.
If important details become too small or crowded, small adjustments—such as increasing line thickness, spacing, or text size—can often improve the final result without changing the overall identity of the logo.
How Should a Leather Patch Be Attached?
The backing should be chosen according to both the leather patch and the final product. For most leather patches, sew-on is the most straightforward option for a secure, long-term attachment. Heat-applied backing can also be used in suitable projects, but both the leather and the final product need to tolerate the required application temperature.
Sew-On Leather Patches
Sew-on patches are stitched directly to the final product and are commonly used on hats, jackets, denim, bags, and workwear. They are a reliable choice when permanent attachment and durability are priorities.
Iron-On or Heat-Applied Leather Patches
Heat-applied patches use a heat-activated adhesive backing. They can make installation faster, but the leather, adhesive, and garment material must all be suitable for the required temperature and pressure.
Adhesive and Velcro Backings
Adhesive backing is mainly suitable for temporary positioning or light-duty applications, while Velcro is useful when the patch needs to be removed or replaced.
A simple way to think about backing is:
| Final Need | Practical Starting Option |
|---|---|
| Long-term permanent attachment | Sew-on |
| Faster heat installation | Heat-applied backing |
| Temporary/light-duty positioning | Adhesive |
| Removable or interchangeable patch | Velcro |
The final construction should still be confirmed according to the actual product where the patch will be used.
What Should You Check on a Leather Patch Sample?
A sample helps you confirm how your artwork, leather, and backing work together before bulk production. Instead of judging only whether the patch “looks good,” check a few practical details:
- Logo and text clarity: Make sure small lettering, thin lines, spacing, and important details remain easy to recognize.
- Leather color and surface: Confirm the approved color and finish. With genuine leather, slight natural variations in grain and tone are normal.
- Edge and cut quality: Check that the outline is clean, smooth, and consistent with the approved shape.
- Backing and attachment: Confirm that the correct backing has been used and, when possible, test it on the actual or a similar final product.
- Overall accuracy: Compare the sample with the approved artwork for size, shape, logo position, spelling, color, and decoration method.
These checks are usually enough to catch the most important issues before bulk production begins.
Basic Care Tips for Leather Patches
Care requirements vary depending on the leather, surface finish, backing, and final product, but these basic habits can help protect the patch:
- Avoid prolonged soaking, especially with genuine leather.
- Keep away from excessive heat, which may affect the leather, coating, or adhesive backing.
- Clean gently with a soft cloth instead of aggressive scrubbing.
- Air dry naturally if the patch becomes wet.
- Check the garment care instructions before washing a product with an attached leather patch.
Genuine leather may also need an appropriate leather-care product depending on its finish.If the patch is attached to a washable garment, always consider both the care requirements of the patch and the care requirements of the garment before washing.
Frequently Asked Questions About Leather Patches
Not all leather patches are waterproof. Water resistance depends on the leather, surface finish, and treatment. If the patch will be regularly exposed to rain or outdoor conditions, mention this before selecting the material.
Some leather patches can use heat-activated backing, but both the leather and the final product must tolerate the required heat and pressure. Always confirm compatibility before application.
Their lifespan depends on the material, attachment method, use conditions, washing, and care. Choosing the right leather and backing for the final product is usually more important than relying on a fixed lifespan.
Yes, but very small text and thin lines may lose clarity at smaller patch sizes. The artwork may need slight adjustments depending on the material and decoration method.
Choosing the Right Leather Patch for Your Project
Choosing a leather patch becomes much easier once you focus on a few practical decisions: the material, the way your logo should appear, the backing, and where the patch will finally be used.
There is no single “best” leather or decoration method for every project. The best result comes from matching the material, artwork, production method, backing, and final application to one another.
If you are still unsure which combination is right for your design, you can send us your artwork and tell us where the patch will be used. We can help you review the material, decoration method, size, and backing before you move on to sampling.